Assignment - How to Guide
| সাইট: | Dr. Indira Koneru |
| পাঠ্যক্রম: | Using Moodle copy 1 |
| বই: | Assignment - How to Guide |
| মুদ্রণ করেছেন: | অতিথি ব্যবহারকারী |
| তারিখ: | শনিবার, 20 ডিসেম্বর 2025, 9:20 PM |
বর্ণনা
An opportunity to learn how to use the Assignment module. This is used throughout the ATEP course.
1. Getting Started
Assignment Module
The Assignment module allows students to turn in work easily. You can tell very easily that you are working on by the icon ( ![]() ).
).
In this guide, you will learn about using the Assignment module.
2. Submitting an Assignment
Student's Perspective
From a student's perspective, adding an assignment is much like turning in a traditional assignment. The student will complete their work in as a separate document and then upload the document to the teacher.
The student will start by clicking on the name of the assignment:

In this example, the assignment is titled 1.1.1 Important Technology. Once the student clicks the link, they are ready for the next step.
2.1. Student Instructions
Student's Perspective Part 2
The student has clicked the link to open the assignment. The student is now presented with information to complete the assignment. This should also be communicated prior to the student starting the assignment.
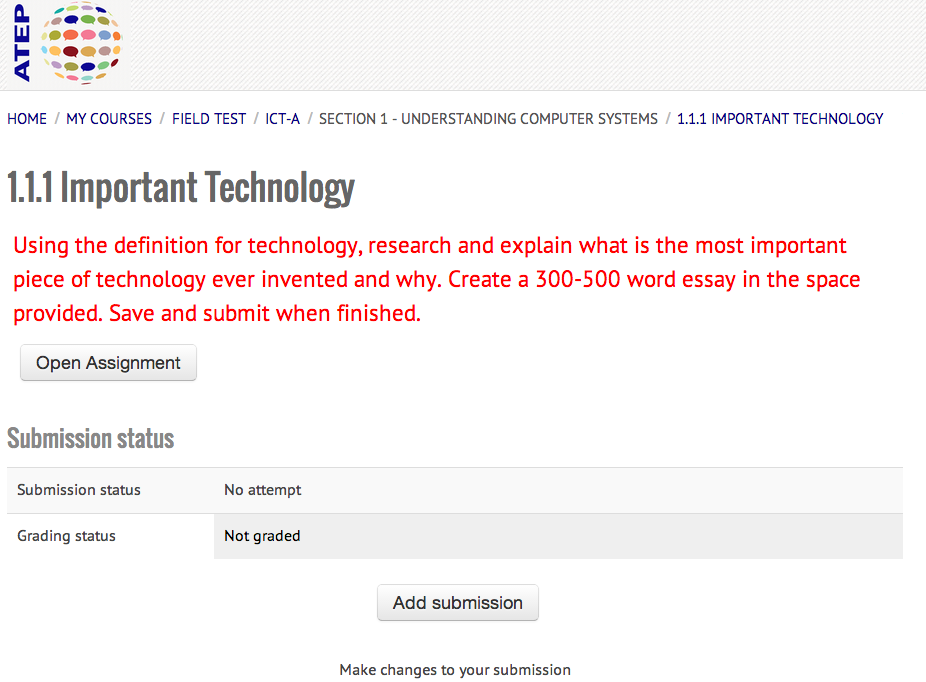
Notice that the student receives information about the assignment, submission status, grading status and a button to submit an assignment (Add submission).
Next, we'll review how students submit an assignment.
2.2. Student Submission 1
Student Submission- Drag & Drop
Once the student clicks the Add submission button, the student will have two ways of adding a submission. Note that the student MUST have the assignment complete as a Word document, text file or some other digital file prior to uploading (turning in).
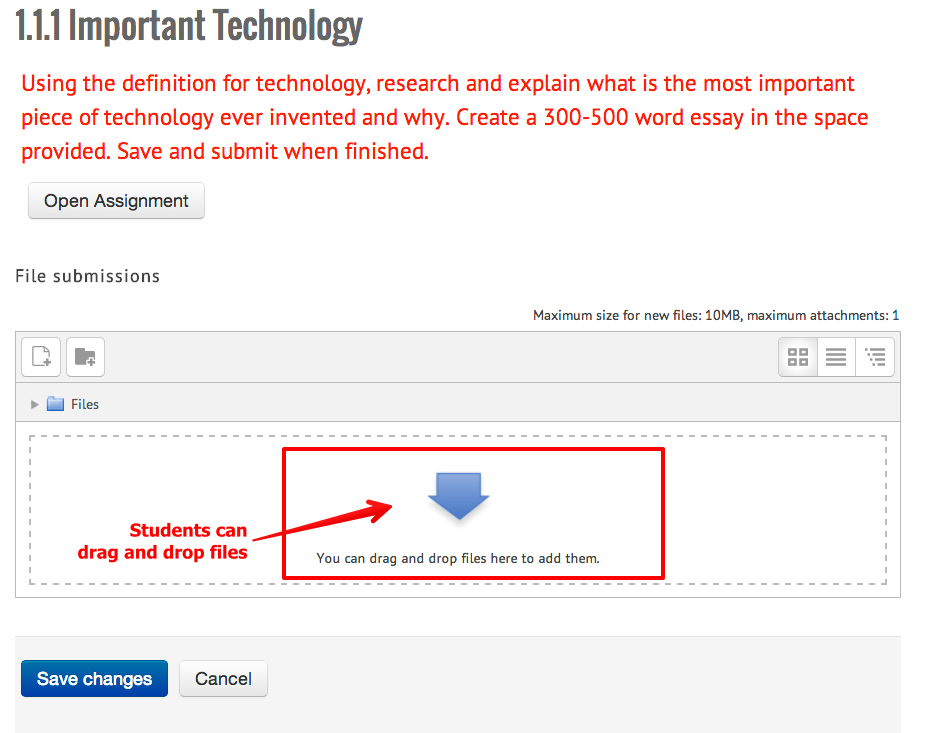
It may be necessary to show students how to resize their browser window so that they can see the window where their document is and the browser window above.
This will work with most modern browsers. However, older versions of Internet Explorer may not work. If that is the case, students should either use Chrome or Firefox, or use the upload link.
Our next topic will cover how students can use the upload link.
2.3. Student Submission 2
Student Submission - Upload link
The previous page showed how students can upload a document to the Assignment module using Drag and Drop. While this is the easiest way to upload the file, this may not work for some students.
Another way to upload a document to the Assignment module is to use the upload link. The student will still click on the "Add submission" button. However, instead of dragging and dropping a document, the student will click the "Add..." icon.
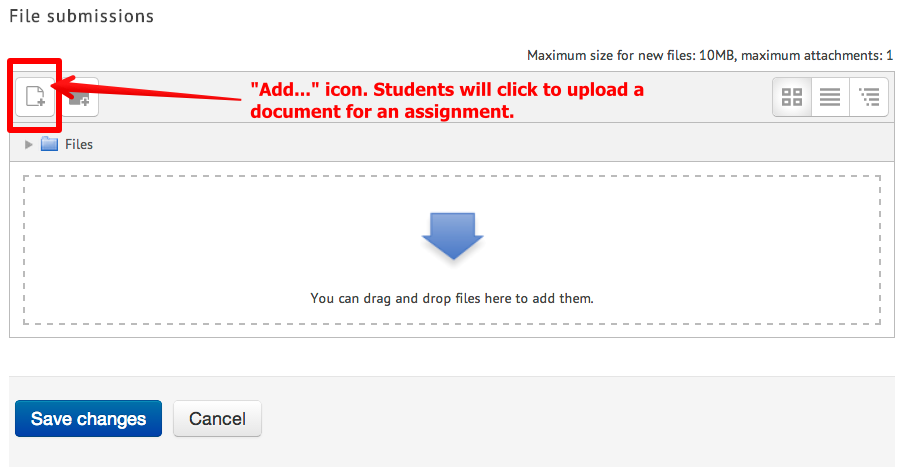
Once the "Add..." button is clicked, the student will be presented with a File Picker. Directions for using the File Picker:
- Click on Upload a file on the left hand panel.
- Click on the Choose file button
- Navigate to the file to be uploaded
- Enter a name in the Save as field
- Click on Upload this file
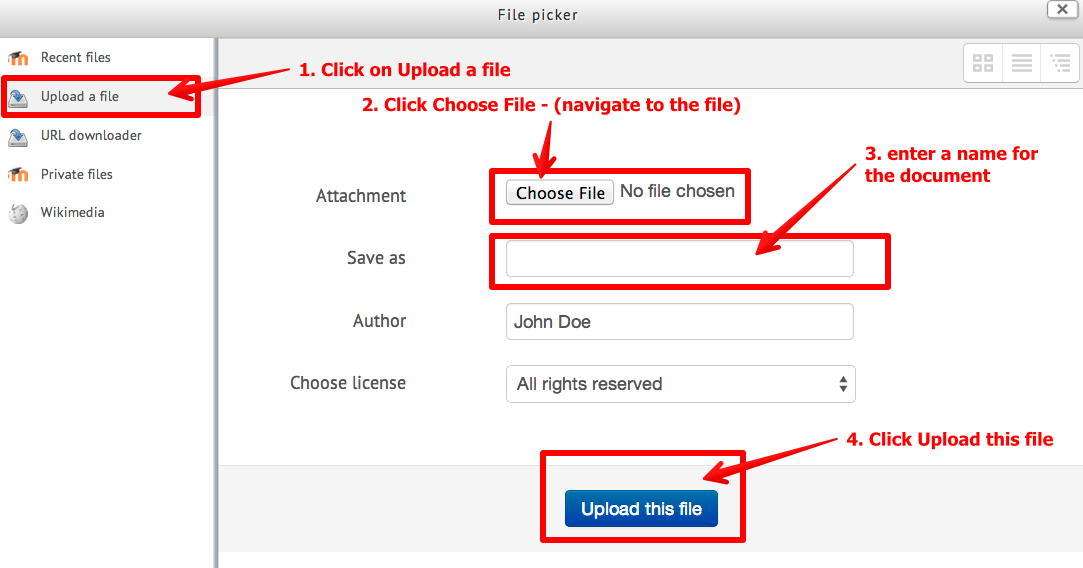
As you can see, it may be easy to use the Drag and Drop feature. However, uploading files will always work. This is also an important skill for students to learn.
3. Feasibility Teacher view
Feasibility Teacher view
Since the main role of the Feasibility Teacher is to grade the assignments, the view for the Feasibility Teacher looks very different. Clicking on an Assignment will open a window that is similar, yet very different, to what the student will see.
The Feasibility Teacher will still see the information for the assignment, but will also see a link to grade the assignment, information on the number of participants (Students), the number of submissions, and the number of assignments needing to be graded.
Notice in the example below that the blue box contains the same information as the student would see. However, the Feasibility Teacher also will see a Grading summary section. Finally, there is a link to View/grade all submissions.
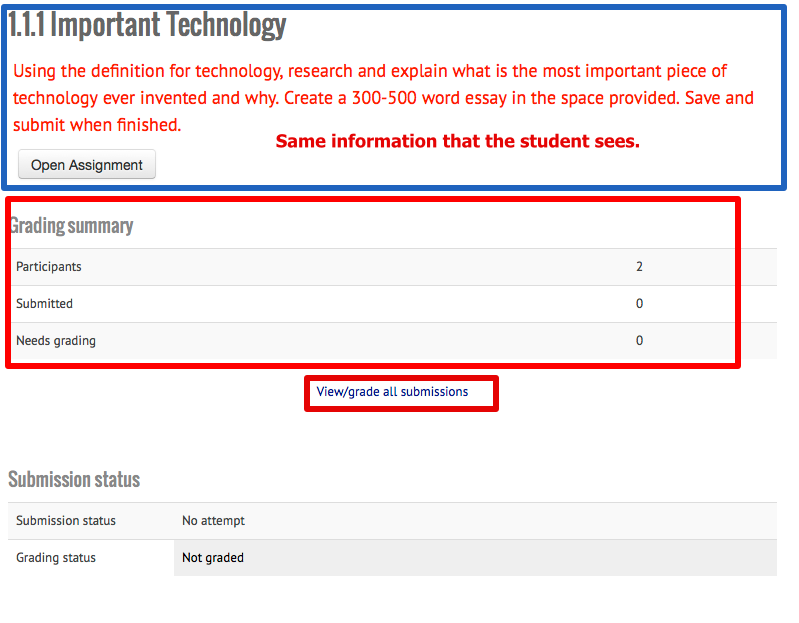
When the Feasibility Teacher is ready to grade submissions, click on View/grade all submissions.
4. Grading
Feasibility Teacher - Grading
Once the Feasibility Teacher has clicked the "View/grade all submissions" link, the Feasibility Teacher will see a list of students enrolled in the course and whether or not they have submitted an assignment.
Notice in the screenshot below that there are two students enrolled. One of them has submitted a document to be graded. This is highlighted in green in the Submission status column. The document itself is in the last column.
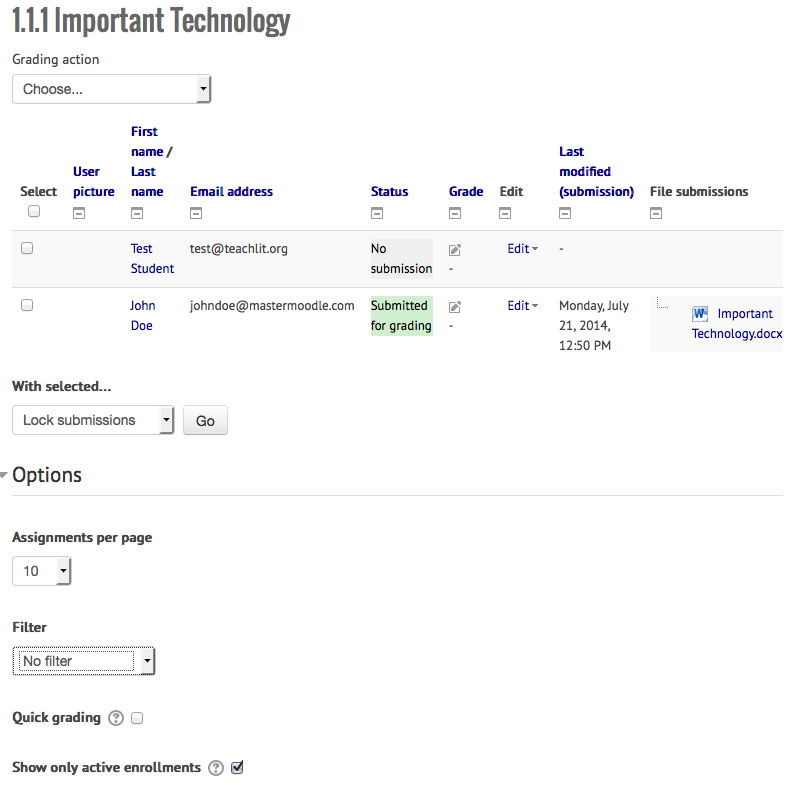
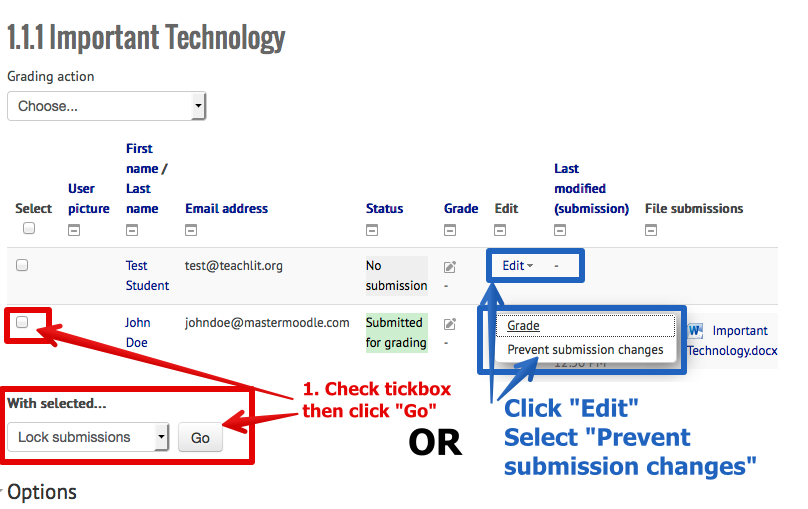
Important Note: at this point, the student could still change the submission. In order to prevent the student from changing the submission, the Feasibility Teacher needs to Lock the submission. Locking the submission is important to avoid confusion. If the student wants to make changes and their submission hasn't been graded or locked, they could upload a new document. The Feasibility Teacher would then be grading a different document than the student is expecting to be graded. There are two ways of locking the submission:
- Click on the tick box next to one or more submissions. Make sure the choice is "Lock submissions. Click "Go" (Note, the Feasibility Teacher can lock a large number of submissions at once using this method).
- Click on "Edit" in the Edit column. Select "Prevent submission changes"
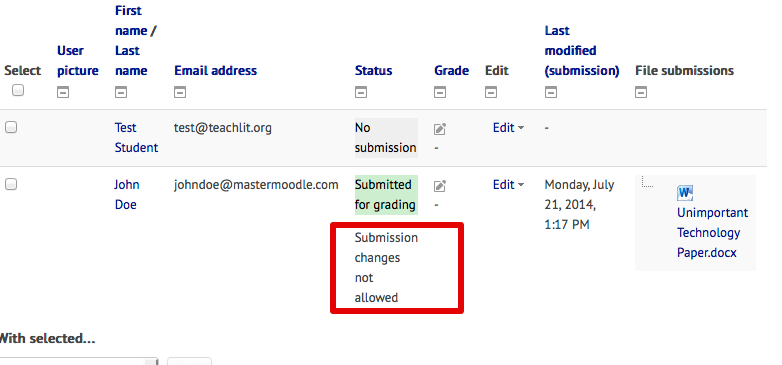
Once the Feasibility Teacher has locked the document, you'll notice that Status will change to include the Submission lock:
Now the Feasibility Teacher is ready to grade this assignment. (Using the tick box under "Select" will automatically select all of the students. Using "Lock submissions" and the "Go" button will lock all of the submissions.)
Now let's grade.
4.1. Grading- Continued
Grading - Continued
Once the submission is locked it is ready to be graded. Click on either the Grade icon or choose Edit | Grade.
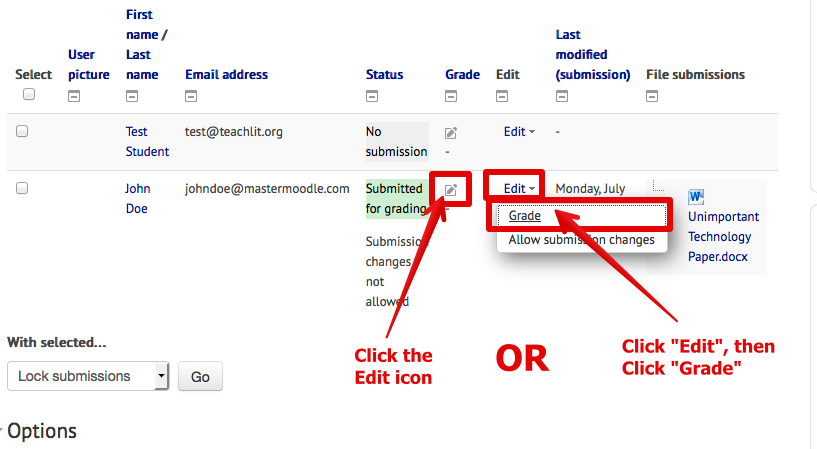
This will take you to the Grading screen.
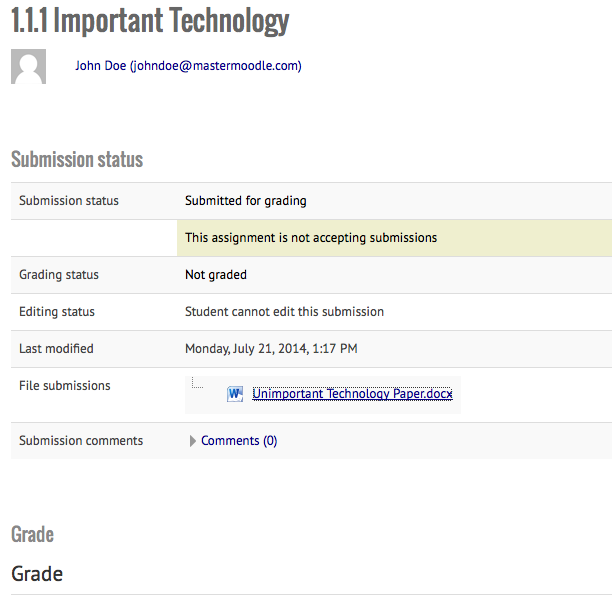
Notice the information available and the File submission. Clicking on the attachment after File submissions will open a prompt to either download or open the document. (Note that your computer must have a program associated with that file type to open).
*Note that there is a section for Submission comments. Students can enter comments when submitting or after. The Feasibility Teacher can also enter comments. Simply click on the disclosure triangle to the left of the word Comments. The number after the word Comments indicates the number of Comments.

*If you want to add a comment, type in the Add a comment box and click Save comment.
Once you have opened and graded the document, scroll down to reveal box to enter the grade.
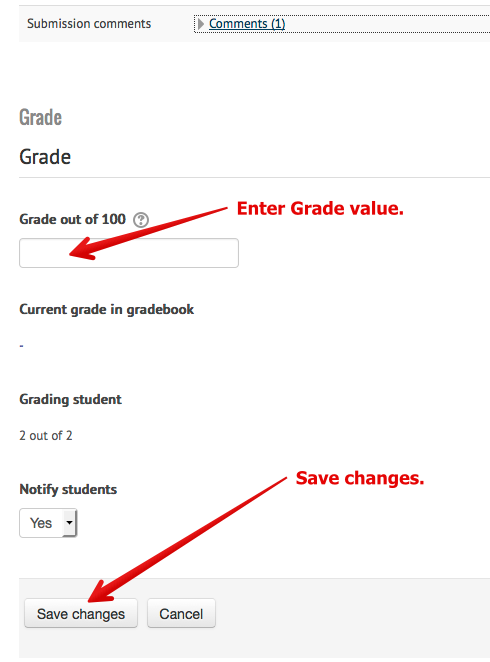
Enter the value of the grade. Generally, the Feasibility Teacher can then click Save changes and go to the next item to be graded.
Note though that the Feasibility Teacher can also choose note to Notify students.
4.2. Alternate Grading Method
Alternate Grading Method
Some Feasibility Teachers may find it easier to download all of the documents, grade them and then enter a grade in the grade book.
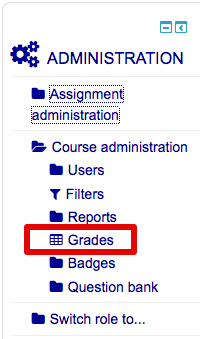
In the Administration block, Click on Course Administration, then Click on Grade. This will take you to the Grade book.
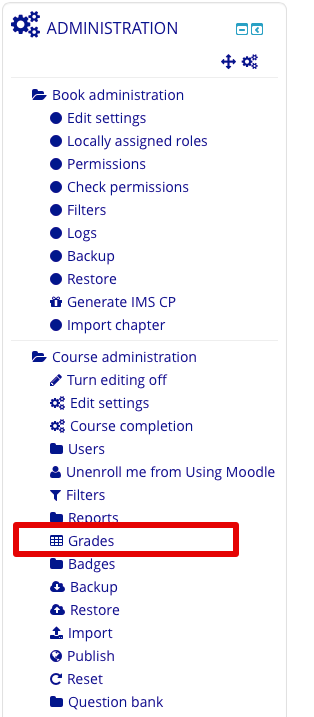
Once you are in the Gradebook, click on the title of the Assignment that you want to grade.
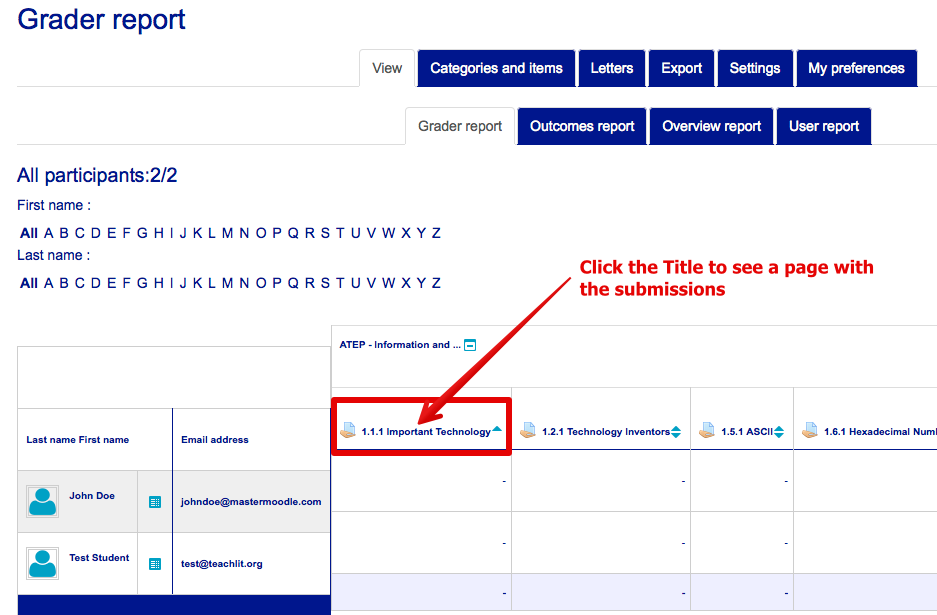
*Here's a secret. This link will take you to the same Assignment Grade page as the previous instructions. Make sure that you click on the title and not just the triangle.

Click on View/grade submissions (just like before).
This time, we will choose a Grading Action. From the Drop down Menu selection under Grading actions, select "Download all submissions..."
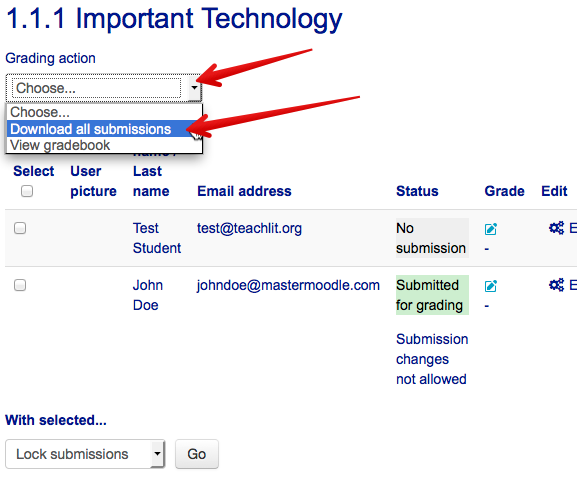
This will open a Download prompt on your computer. You will have the choice to either open or download.
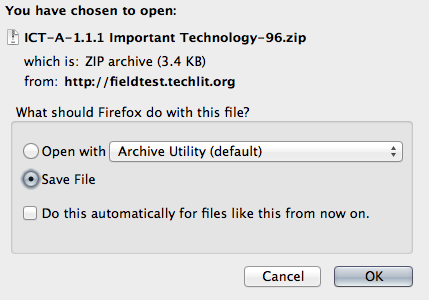
All of the documents that have been submitted for grading will be included in a zip file. Expanding that file will reveal individual documents with student names as the beginning of the Title.
4.3. Alternative Grading-Manually entering grades
Alternative Grading
Manually entering grades
Once you have downloaded and graded the documents from the Assignment, you are ready to enter those grades into the Gradebook.
Remember to get to the Gradebook, Click on the Administration block, then Course Administration, then Grades.
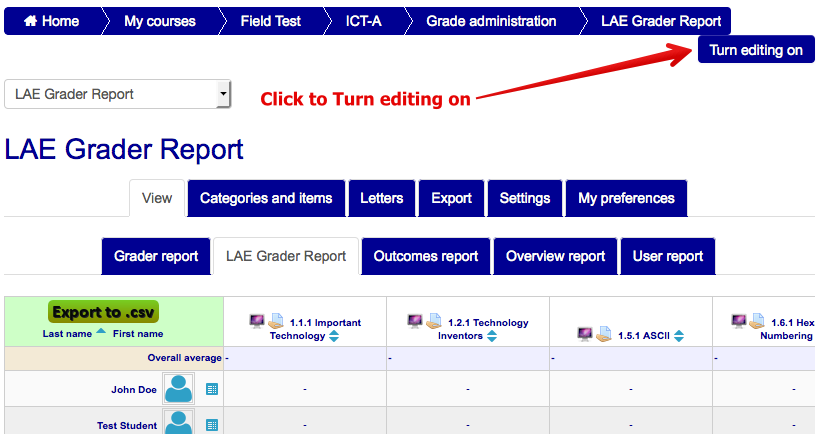
Once the Grade book is open, turn editing on by clicking the "Turn editing on" button on the top, right hand side of the screen.
Now you will see boxes under the each assignment. Simply type the scores into the appropriate box. Click the next box to enter the next score.
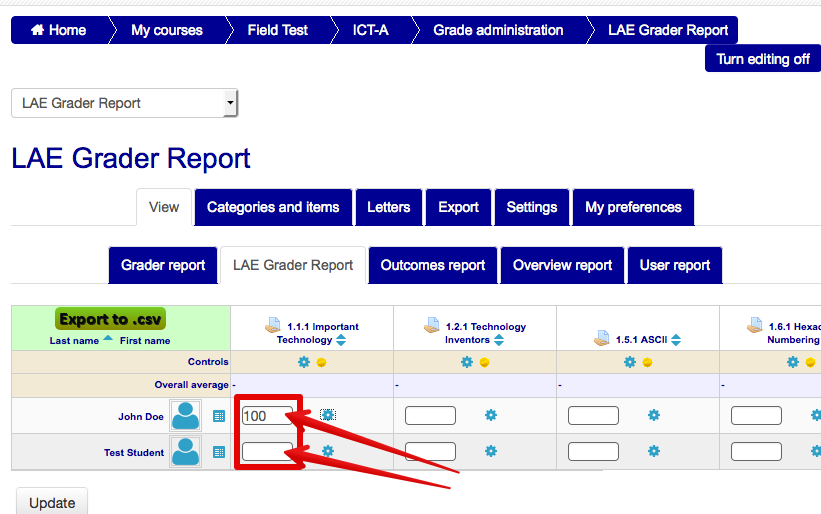
Once you have entered all the scores, Click the Update button.