Gradebook
| Site: | Dr. Indira Koneru |
| Course: | Using Moodle copy 1 |
| Book: | Gradebook |
| Printed by: | Guest user |
| Date: | Sunday, 14 December 2025, 2:06 AM |
Description
Introduction to using the Gradebook.
1. Gradebook
Gradebook
The Gradebook will provide a recording of grades. The Gradebook within Moodle is extremely powerful. This is also an area of great debate amongst educational professionals. ATEP is focused on the delivery of powerful content for student learning and understands that the Feasibility Teachers will be working with existing grade book and Student Information System within the home school. Thus, the Moodle grade book will be simple and straight forward.
The Moodle Gradebook will provide an organized system of grades. Any quizzes that all multiple choice or discrete answers will be automatically scored and entered into the Moodle grade book. Any essays will need to be entered by the Feasibility Teacher.
The Moodle Gradebook will also provide feedback to students in an organized manner.
Only teachers will see a full grade book. Students will only see their grades.
To Open the Gradebook:
Use the Administration block and open Course administration.
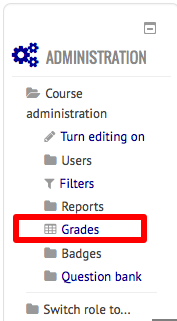
Clicking on the Grades link will take you to the Gradebook.
2. Gradebook components
Gradebook Components
- A Drop down Navigation Menu
- Along the top will be several tabs.
- Student names will be listed along the left side of the grade book.
- Gradable assignments will be listed along the top of the student names.
- Turn Editing On button
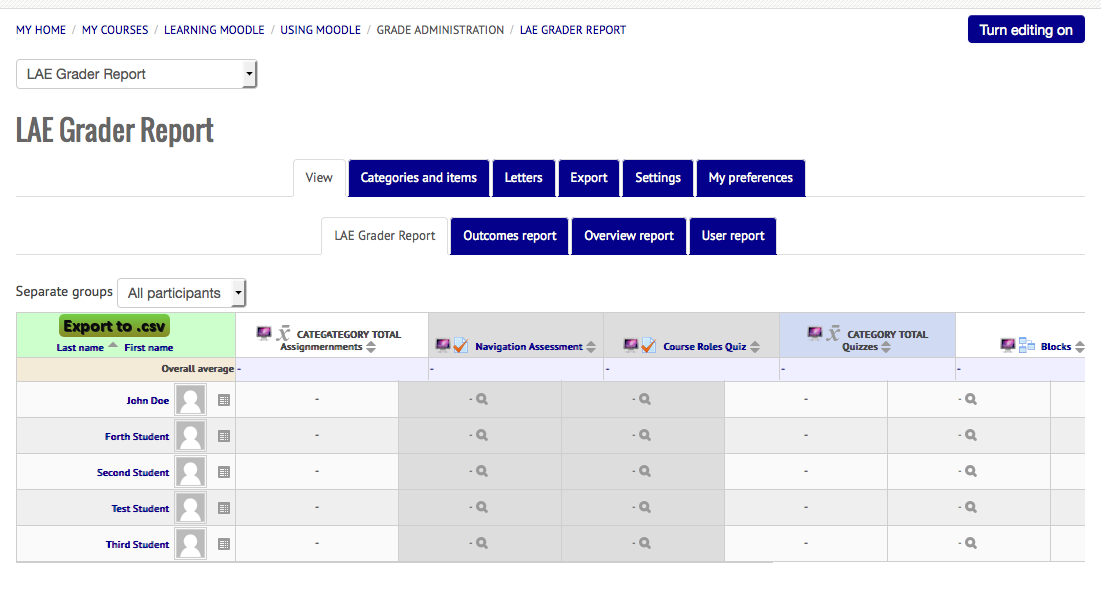
This is the default view. However, the Gradebook will generally reopen to the last view that the Feasibility Teacher selected. Thus, if the last view was of User Report, the Gradebook will reopen to User Report. To return to the default view, simply click on the View Tab and then the LAE Grader tab.
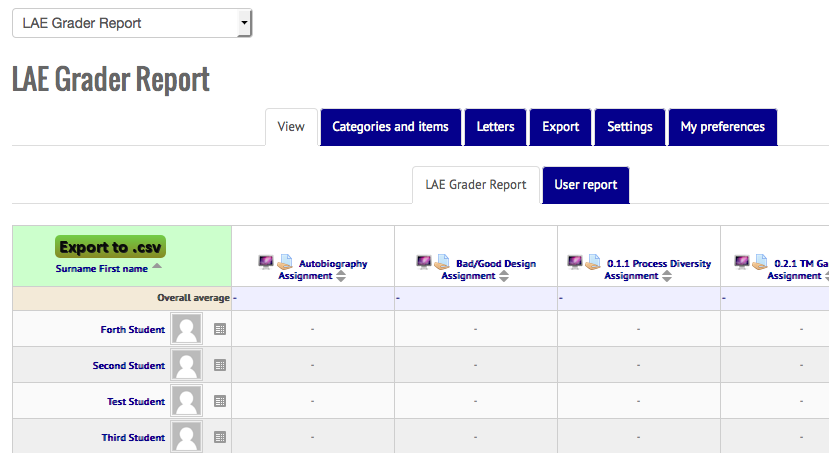
Notice that the View tab is currently selected The sub-tab of LAE Grader Report is then selected. Here you will see all student names, all assignments that are listed as gradable, and the grades that students have received.
Any activities that automatically grade (such as quizzes with only multiple choice answers) will have grades in them as soon as the students complete the module.
The Feasibility Teacher can manually enter grades from here as well.
2.1. Gradebook Tabs
Gradebook Tabs
Tabs are used to organize and navigate around the Gradebook. There are actually two levels of tabs. The main tabs include:
- View
- Categories and items
- Letters
- Export
- Settings
- My Preferences
Each of these tabs contains at least one sub tab. Each tab presents different information. The View tab will be used most often.
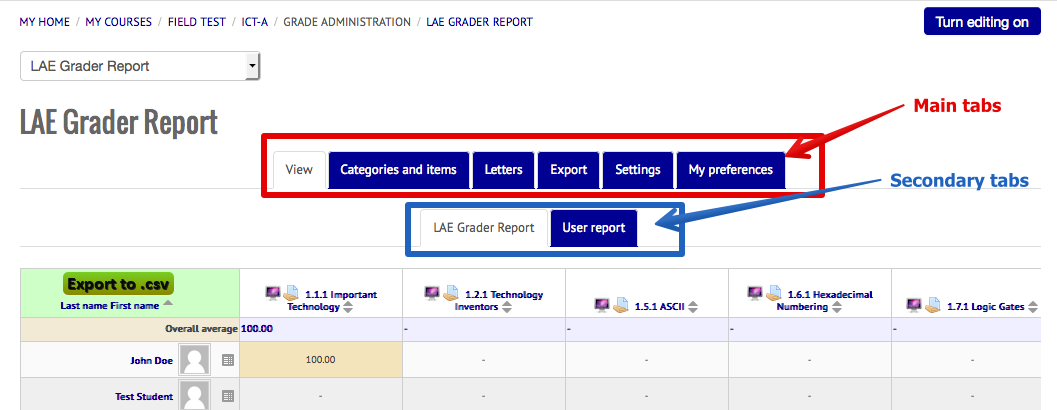
Here the View tab of the Main Tabs has been selected. The LAE Grader Report is the secondary tab selected. This view will provide the Feasibility Teacher with an overview of the students enrolled, the assignments that can be graded and the grades entered (if they exist).
Notice that there are other main tabs and secondary tabs.
- Categories and Items - could be used to establish different categories within the Gradebook. This could be used to set up things like Formative vs Summative assessments.
- Letters will display the grading scale (93%-100%=A). This area also allows the Feasibility Teacher to change these boundaries.
- Export - Allows the Gradebook to be exported to a variety of file types.
- Settings - Allows the Feasibility Teacher to change the default settings of the Gradebook
- My preferences - Allows for preferences to be set.
Drop Down Menu
The Drop down menu at the top will allow the Feasibility teacher to go to the same places as the Tabs do. Both will go to exactly the same pages. This is a matter of preference only.
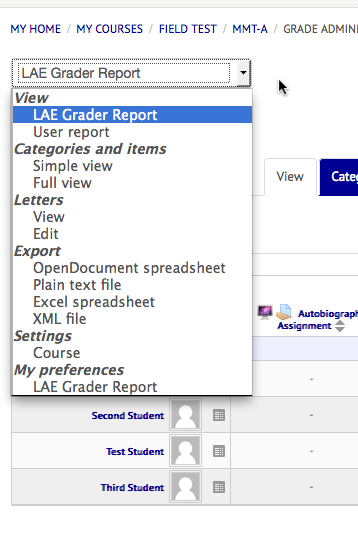
Thus, using the Drop down menu to select User report (under the View heading) will take the Feasibility Teacher to the same place as selecting the View Tab and then selecting the User report on the secondary tab. (*Note that you must select a secondary tab from the Drop down menu.)
2.2. View Tab
View Tab
The Main tab that will be most often is the first main tab: View.
The View tab will consist of 2 secondary tabs:
- LAE Grader
- User report
Most work can be done within the LAE Grader Report tab. This will show all of the students in the first column and all of the assignments that can be graded along the top row. Note that the assignments contain the name of the assignment and an icon which indicates what type of assignment it is. The Feasibility Teacher can click on any of the assignment names to go to that settings for that assignment.
The up/down arrows next to an assignment name will sort the results by ascending grades (up arrow) or descending grades (down arrow) once grades are entered.
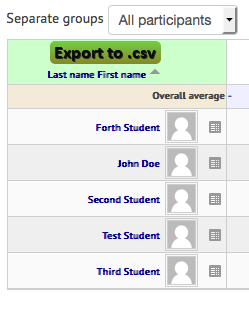
Similarly, the arrow next to Last name or First name will indicate that students are sorted by that field. In the example above, the students are sorted alphabetically by their last name (note that the arrow is next to the Last name). Clicking on "First name" in that first box would sort the students by their first name (see below).
Manually Enter Grades
The View tab can also be used to manually enter grades. Simply click the "Turn editing on" button in the top right hand side of the screen. The View tab will now look like below - with boxes to enter grades.
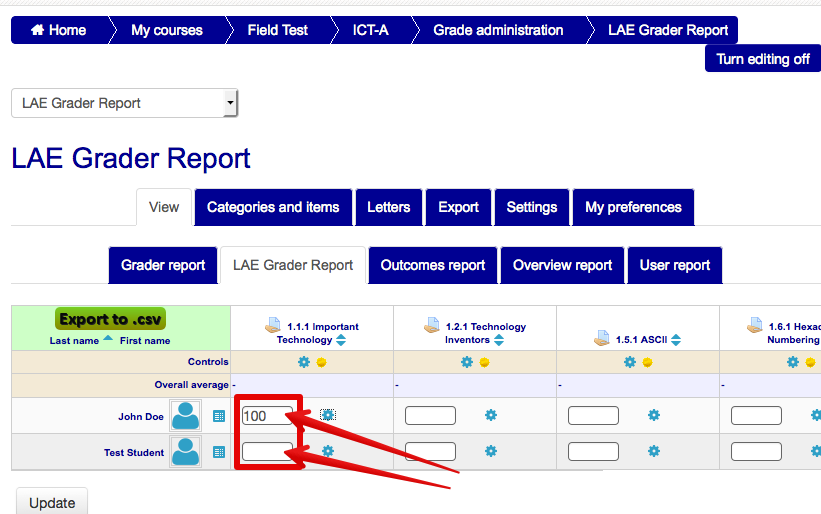
In this example, 100 has been entered manually for John Doe. (*Pro tip- use the Tab key to advance to the next student name for that assignment). When you are done entering grades, click the Update button at the bottom. This will save the changes. (*Please note that if grades are manually entered, grades can NOT be updated through the assignment setting. Any grade changes would need to be done manually).
2.3. View Tab - User Report
View Tab - User Report
The User Report tab will provide a comprehensive overview of the assignments, student grade and possible points. The focus here is a student report rather than a class report. Thus, each report is in the name of a student and then the assignments.
This report does have a lot of information. Let's take a look at an example.
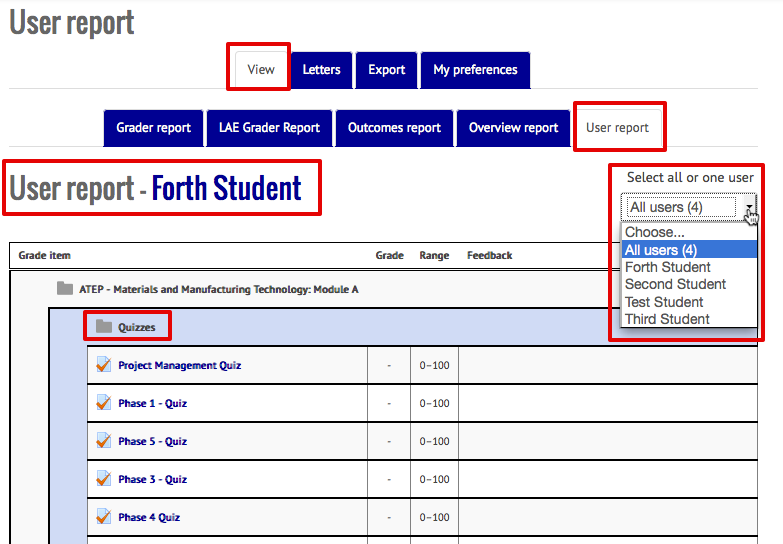
Note that we have selected "View" in the main tab and "User report" in the secondary tab. On the right hand side is a drop down menu to select all or one user. Thus the Feasibility Teacher can either run this report for each student in the course, or just one student in the course. In our example, there are four students enrolled. Thus, we can select either the whole class (all) or one of the students (i.e. Fourth Student, Third Student, Second Student or Test Student).
Next, notice that the User report lists the first student name (in our case Fourth Student). Once we scroll down far enough, we would see the same information for the next student.
The actual report is filled with useful information. Each assignment that can be graded is listed. These listings are grouped by the Category that the assignment is in. Thus, notice that just under the name of the course ( ATEP - Materials and Manufacturing Technology: Module A) at the top of the window in the first box is "Quizzes". Quizzes is a category for this class. Scrolling down would provide the Category Total for the first Category. Scrolling down would reveal the assignments in the next category ( Assignments). Scrolling down even further is the next category (Lessons).
For each assignment, following the title of the assignment will be the grade earned (if any or a - ), the range of the grades (0-100 for this example), and then any feedback provided to the student.
Scrolling down, the same information would be provided for the next student.
Notice:
The User report is also what the student will see when they view their own grades.
3. Categories and Items
Categories and Items
Moodle has a very powerful grade book. Assignments can be broken into categories. However, since this can quickly become a complex issue, it is advised that Feasibility Teachers use extreme caution with these settings.
Categories has 2 tabs:
- Simple
- Full
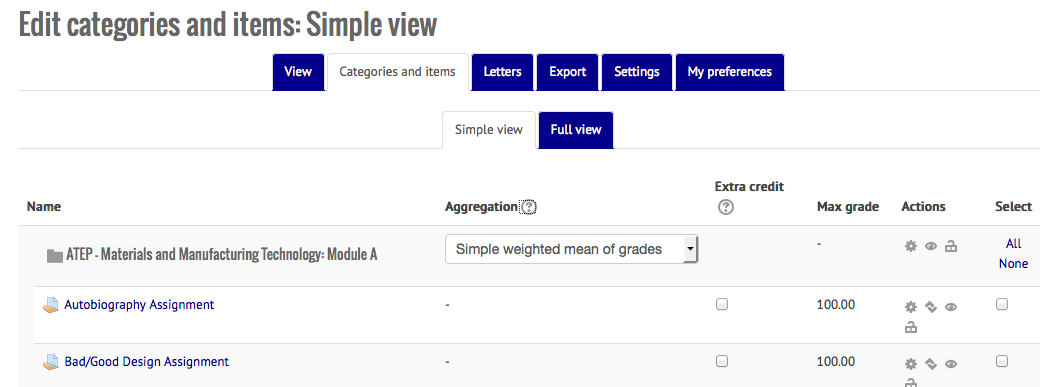
The Categories and Items view will list all assignments. The first row will be the overview of the class. This will include how grades are calculated (in this case: Simple weighted mean of grades). This would also allow the assignment to be assigned as extra credit, shows the maximum grade that can be earned and provides a way of taking action on the assignments.
Actions can be:
- Edit settings
- Move the assignment
- Hide the assignment
- Lock the assignment
Full View
Full view is very similar but adds some additional power. From Full view, Aggregation can be broken down by categories, the lowest grades can be dropped, grade multipliers and offsets can be entered.
4. Groups
Groups
The Feasibility Teacher can grade different groups. This can be extremely handy when dealing with multiple hours of the same class. In this course, we have set up groups for different hours. This way, when it comes time to manually enter grades. In order for this to work, you must have groups already set up and students assigned to groups.
Select Grades from the Course Administration block
Select the Group to grade from the Separate Groups menu selector.
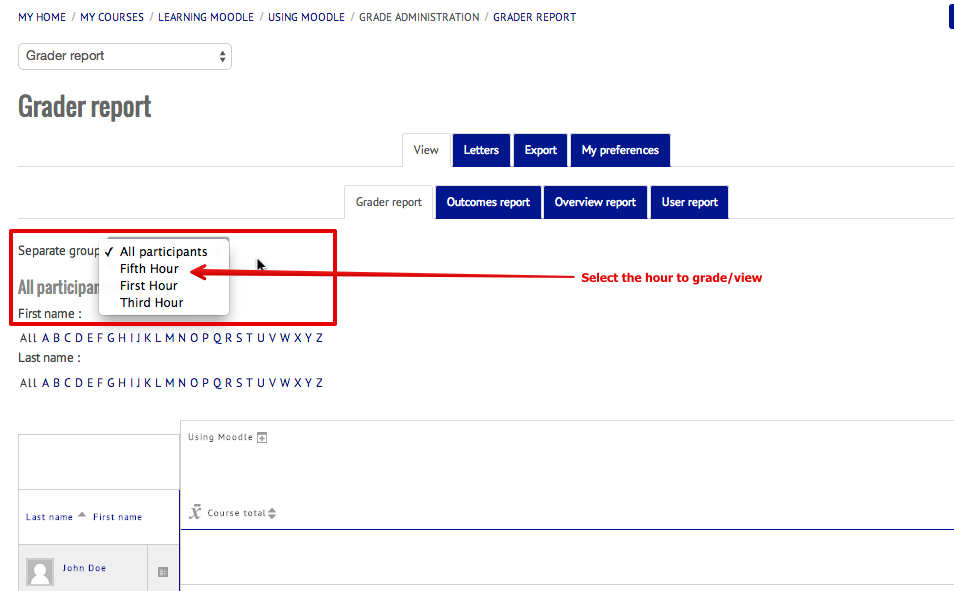
Now just the names of the students that are in those groups will be available for grading.
5. Letters
Letters
Letters will reveal the grading scale. The Feasibility Teacher can also update that scale.
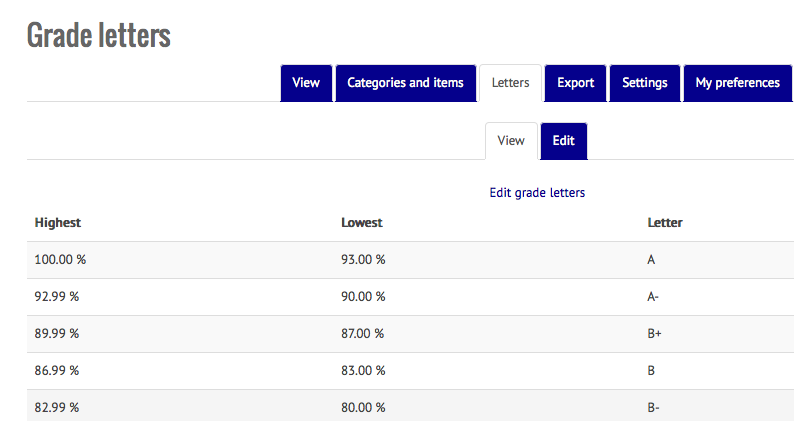
The default is as above. Clicking on either "Edit grade letters" or the Edit secondary tab, will open the grading scale for editing.
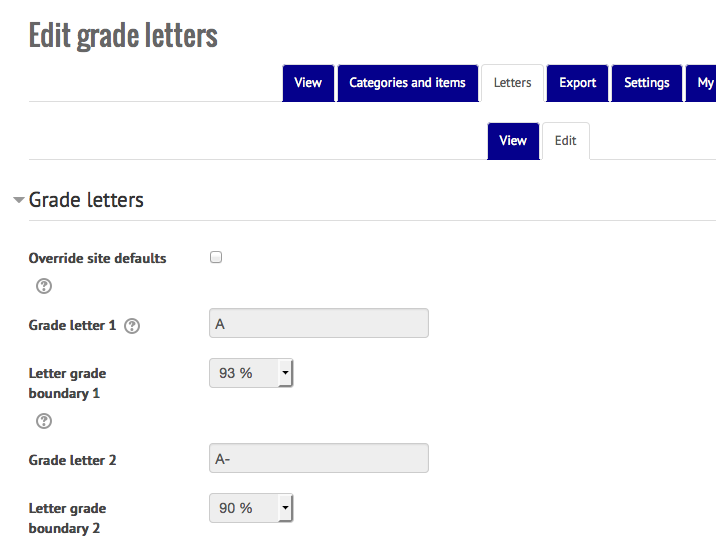
From here the Feasibility Teacher would need to click the "Override site defaults" check box. Then the boundaries can be clicked on and changed. The Grade letters can also be changed. Once done, scroll to the bottom and "Save changes".
6. Export
Export
Grades can easily be exported out of Moodle. This can be handy for keeping back up records or for importing into a different grade book. (Importing into another grade book is an advanced function dependent upon that grade book).
Exporting can be done to a number of file formats. These are the secondary tabs. These file formats are:
- OpenDocument spreadsheet
- Plain text file
- Excel spreadsheet
- XML file
Additionally, there are options as what type of data for grades is exported (real, percentage, letter), number of decimal places and then a listing of all assignments.
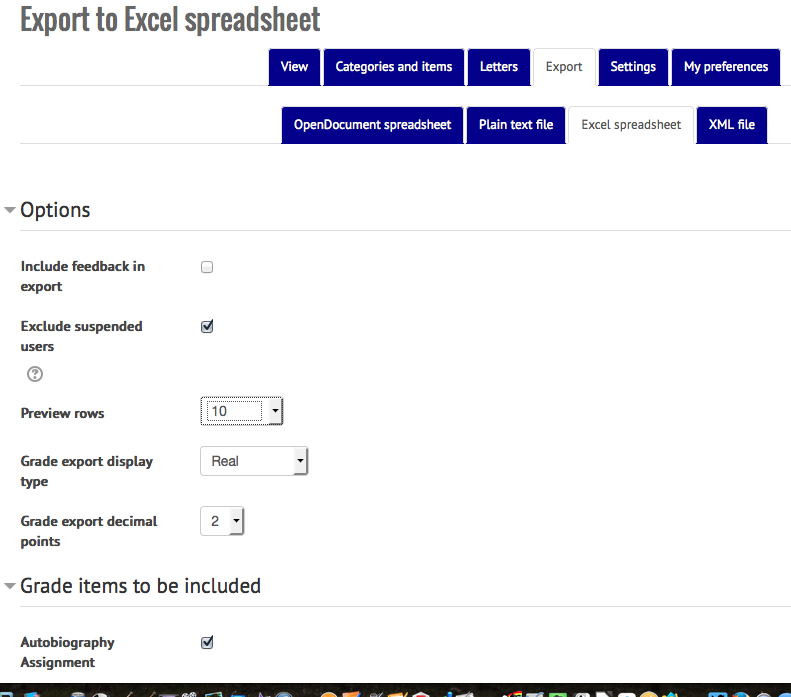
Once the appropriate selections have been made, scroll to the bottom and click "Submit" This will create a preview of the file and include a button to "Download". The preview will display the first few rows of the data. The download button will download the file to your computer.